End-to-End Testing With Cypress
Intro
End-to-end testing can be intimidating. There are different reasons for this intimidation, but ultimately it’s the initial lack of speed when setting up end-to-end testing on a project. That’s where Cypress comes in handy. With Cypress, you can quickly and easily implement crucial tests that help allow for a higher quality product with better integrity. In this article, we will review the initial setup of Cypress, creating a test with Cypress, and expanding the testing further with some real-life use cases.
Prerequisites:
- Node.js installed.
- Some JavaScript knowledge.
- Some Github knowledge.
Initial setup
Setting up Cypress is fairly straightforward.
npm install cypress --save-devCypress is now installed in your project directory as a dependency. Next, we will open the Cypress testing interface and this will add example tests to your project.
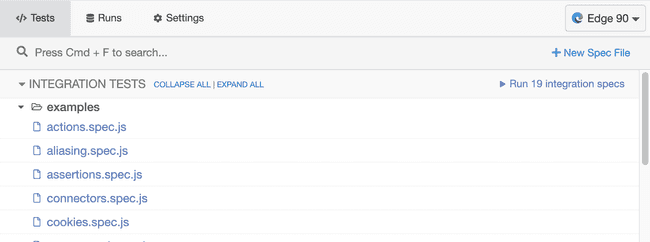
You can run this command to open the Cypress testing interface. This interface will list all the tests available in your project.
$(npm bin)/cypress open
In your project root directory, you will see a folder labeled “cypress”, the e2e folder contains all the example test specs.
These example test specs are fantastic to review the different use cases. I’d recommend after installing Cypress, creating a few core tests needed for your application.
Creating a test
In the e2e folder let’s create a folder called core_elements, in this folder, we will write tests to check that our website has the HTML elements we need. Next, let’s create a test called footer.spec.js. We will use this test to check that our website has a footer with the expected elements.
Cypress uses JavaScript for its tests, making it very easy for anyone who knows a little JavaScript. Some things can be comparable to jQuery like how the selectors work, so some of the syntaxes might look familiar if you also know jQuery, if not that’s okay too!
Here is an example test in which we will check if this current website has a footer and as a bonus, we will check for a social media link.
/// <reference types="cypress" />

context('Homepage', () => {
  // Before each test, visit the local homepage
  beforeEach(() => {
    cy.visit('http://localhost:8000')
    // If we had a baseUrl set we could do this instead
    // cy.visit('/')
  })

  // Check that a footer exists
  it('Has a footer', () => {
    cy.get('footer').should('exist')
  })

  // Check that a twitter link exists in the footer
  it('Has a twitter link in the footer', () => {
    cy.get('footer .social--twitter').should('exist')
  })
})
Notice the beforeEach brings our test to the page we want to test, then we are using the get() function to evaluate the document element.
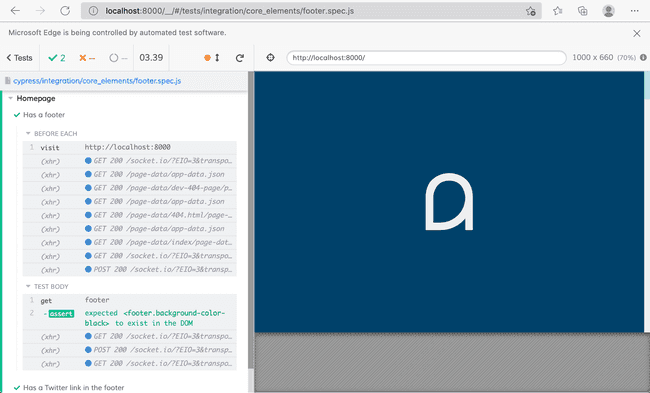
In the Cypress interface, this test can be run and a visual output of the test will be displayed.
This is a very simple example, next we will discuss some more realistic use cases you might be able to apply to your project.
Use cases
Cypress has a wide variety of use cases, on the libraries’ website they have a great list of recipes.
Here are a few great example use cases that can quickly impact your website. Let’s take a look at some example code for each test type.
- Testing login
- Linting inline CSS elements
- Continuous integration
Testing login
In this login example, we make an XHR request. Alternatively, you could fill in the actual form interface with the Cypress type() function.
/// <reference types="cypress" />

describe('Logging in using XHR request', function () {
  const username = 'testUsername'
  const password = 'testPassword'

  it('can bypass the UI and still log in', function () {
    cy.request({
      method: 'POST',
      url: 'http://localhost:8000/login',
      body: {
        username,
        password,
      },
    })

    // Check for session cookie
    cy.getCookie('your-site-session-cookie').should('exist')

    // Visit the page behind the authentication
    cy.visit('/profile')
    cy.contains('h1', username)
  })
})
After you set up a working login test with your website, you may want a custom login function that you would call before any tests that require the user to be logged in.
In cypress/support/commands.js you can add a custom function like this:
// Default form login
Cypress.Commands.add('loginByForm', () => {
  const username = 'testUsername'
  const password = 'testPassword'

  cy.request({
    method: 'POST',
    url: 'http://localhost:8000/login',
    body: {
      username,
      password,
    },
  })
})
Then in your tests, you can call this function before your test evaluations like the following:
/// <reference types="cypress" />

describe('Logging in using XHR request', function () {
  before(() => {
    // log in only once before any of the tests run
    cy.loginByForm()
  })

  it('can bypass the UI and still log in', function () {
    // Check for session cookie
    cy.getCookie('your-site-session-cookie').should('exist')

    // Visit the page behind the authentication
    cy.visit('/profile')
    cy.contains('h1', 'testUsername')
  })
})
Notice our tests will be much more concise the more we need the user to be authenticated.
Linting inline CSS elements
I had a website I was working on where the CMS didn’t have any CSS linting. This became problematic when there was a CSS typo saved and it made it very hard to find where the broken CSS was.
I decided to create a test where we check each inline <style></style> element. Here is what that test looks like:
/// <reference types="cypress" />
const path = require('path')

describe('Validates CSS', function () {
  // with respect to the current working folder
  const downloadsFolder = 'cypress/downloads'

  context('Style elements', function () {
    it('Has valid css in style element', () => {
      const downloadedCssFile = path.join(downloadsFolder, 'styles.css')

      // Go to the page needing to be checked
      cy.visit('http://localhost:8000')

      // Validate each style element as a CSS file
      cy.get('style').each(($el) => {
        cy.writeFile(downloadedCssFile, $el.text())

        cy.exec(
          `$(npm bin)/csslint ${downloadedCssFile}`,
          { failOnNonZeroExit: false }
        ).then((obj) => {
          // Output the specific error message
          if (obj.code == 1){
            throw obj.stdout
          }
        })
      })
    })
  })
})
A few things to note with this, we need to have the csslint library installed in our project. The cy.exec() function allows us to run the CSS linter on our file we have created as though it is an existing CSS file. This means you can utilize any node package and test against any errors that the package may result in when testing.
Continuous integration
Cypress can easily be implemented in your continuous integration pipeline. In your pipeline simply add the dependencies and the commands needed for the Cypress tests.
The following is an example of a Github workflow configuration. This will run cypress every time there is a commit.
name: Automated testing

on:
  # Run automated testing on any commit.
  push:

jobs:
  run-automated-testing:
    runs-on: ubuntu-latest
    env:
      CYPRESS_RECORD_KEY: ${{ secrets.CYPRESS_RECORD_KEY }}
    steps:
      #  Official GitHub Action used to check-out a repository so a workflow can access it.
      - uses: actions/checkout@v2

      - name: Install Node.js
        uses: actions/setup-node@v1
        with:
          node-version: '14.18.0'

      - name: Install Project Dependencies
        run: npm ci

      - name: Run Cypress tests
        run: npm run cypress:test
The npm run cypress:test line, runs the command defined in the package.json file. The key CYPRESS_RECORD_KEY must be set in Github as an “action secret”. An “action secret” is an environment secret for Github actions.
Next is an example package.json that contains the scripts for running the automated test. The script cypress:test records test results to Cypress dashboard.
{
  "scripts": {
    "cypress:run:record": "$(npm bin)/cypress run --record --key $CYPRESS_RECORD_KEY",
    "cypress:test": "start-server-and-test develop http://localhost:8000 cypress:run:record"
  }
}
The Cypress dashboard is a service that Cypress offers that is a great visual dashboard of test runs. Tests can be recorded to the dashboard from your local environment as well, you just need your dashboard key. More information on the Cypress dashboard can be accessed on the Cypress website.
You can find an example of the scripts for continuous integration in my personal website repository.
Conclusion
Although this is just scratching the surface of Cypress’s capabilities, I hope it inspires you to try it out on one of your projects. With Cypress, you can have important tests up and running in no time.
About the author

Written by Nicholas Diesslin Pizza acrobat 🍕, typographer, gardener, bicyclist, juggler, senior developer, web designer, all around whittler of the web.
Follow Nick on Twitter!
