OBS Websocket Introduction - Using Node.js
Intro
OBS Studio is a free project for screen recording and streaming. Most streamers across the internet use some form of OBS Studio. In this post, let’s learn programming interactions with OBS Studio using Node.js.
Prerequisites:
- Familiarity with OBS Studio.
- OBS Studio installed.
- obs-websocket plugin installed in OBS Studio (this is installed by default in OBS Studio version 28).
- Understanding of Node.js or Javascript.
- Node.js installed.
Setting up the Node.js application
First, initialize Node.js in your repository.
npm initNext, add obs-websocket-js to the project.
npm install obs-websocket-js -saveCreating the script
Now the project is set up. Let’s create a script that sends a command to change the text of a title in OBS Studio.
Create a file in the root of the project index.js.
In the project file, import the library obs-websocket-js.
const OBSWebSocket = require('obs-websocket-js');Next, let’s create a method for connecting to OBS Studio and sending updates.
The first step is to create an object with the obs-websocket-js library.
const obs = new OBSWebSocket();The next step is to connect to OBS Studio using the established obs variable. Notice there is a catch if the connection to OBS Studio fails. NOTE: please make sure you use a password when connecting to secure your connection. There is information on how to do so here.
obs.connect()
.then(() => {
  console.log('OBS is connected!');
}).catch(err => {
  console.error('Failed to connect to OBS', err);
});
If you run the script with Node.js, it should connect to OBS Studio. If the script doesn’t connect, OBS WebSocket isn’t enabled. In OBS Studio, navigate to “tools > obs-websocket settings” enabling websockets.
To run this script in the terminal, use this command.
node index.jsCreate the request to OBS Studio
Now, we can create a request for OBS Studio to update our broadcast. Review the obs-websocket documentation to format requests. In version 5 of obs-websocket, there is a more generalized format for updating elements in OBS. You can update elements using SetInputSettings. This requires the name of the element and an object with the pieces to update. You can find a great note on the transition here.
obs.call('SetInputSettings', {
'inputName': 'Example Title',
'inputSettings': {
'text': 'Hello Pizza!'
}
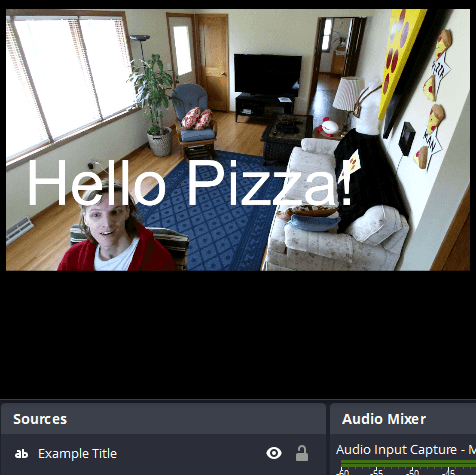
});In this example, the request updates the “Source” title named “Example Title”. In the request, we determine the input settings for the text value. Finally, add the request inside the successful connection.
obs.on('Identified', () => {
  obs.call('SetInputSettings', {
    'inputName': 'Example Title',
    'inputSettings': {
      'text': 'Hello Pizza!'
    }
  });
});
The final Node.js script, with comments
/* Import web socket. */
const OBSWebSocket = require('obs-websocket-js').default;

/* Create new class using library. */
const obs = new OBSWebSocket();

/* Establish OBS connection. */
obs.connect()
.then(() => {
  console.log('OBS is connected!');
}).catch(err => {
  console.error('Failed to connect to OBS', err);
});

/* OBS connection is established and identified. */
obs.on('Identified', () => {
  /* Request to update title. */
  obs.call('SetInputSettings', {
    'inputName': 'Example Title',
    'inputSettings': {
      'text': 'Hello Pizza!'
    }
  }, (err, data) => {
    /* Error message and data. */
    // console.log('Using call SetInputSettings:', err, data);
  });
});
Here is my working example, we did it!
Conclusion/Key Takeaways
In conclusion, we created a script to connect to OBS Studio using OBS WebSocket. Then we updated a title in OBS Studio with Node.js.
4 takeaways:
- Controlling OBS Studio with OBS WebSocket is possible.
- Using Node.js a script can change OBS Studio.
- Automating parts of your OBS Studio is now possible.
- Batch requests limit the number of requests needed to change many items.
This is the start of programming your OBS Studio setup. There are a lot of great things you could do with OBS WebSocket. Some ideas are: rotating text, showing the current weather, or changing camera inputs. OBS WebSocket allows you to program control over your OBS Studio setup. How cool is that?!
References
Project resources
About the author


Written by Nicholas Diesslin Pizza acrobat 🍕, typographer, gardener, bicyclist, juggler, senior developer, web designer, all around whittler of the web.
Follow Nick on Twitter!